


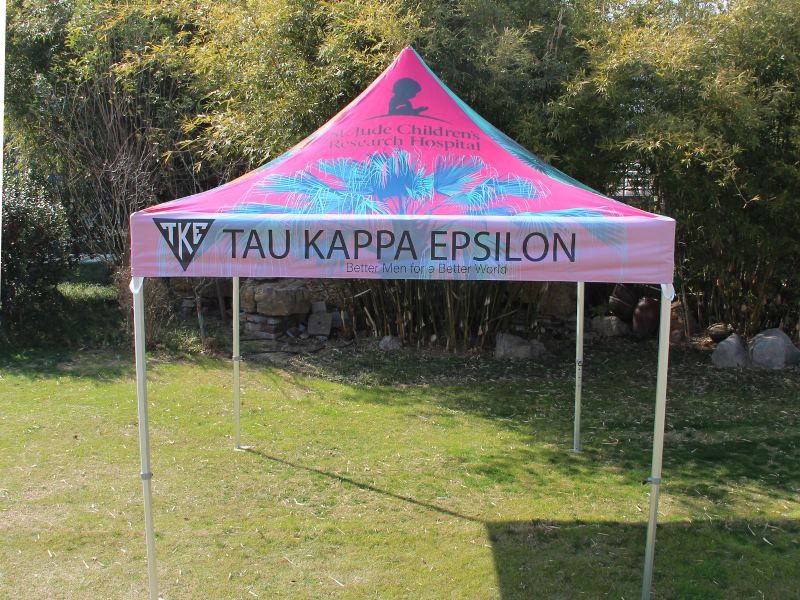
As trade shows, festivals, and outdoor corporate gatherings continue to scale rapidly, businesses are looking for high-impact, durable solutions to capture consumer attention and assert brand authority.
Enter the custom-printed tent. A custom canopy or frame tent acts as a mobile billboard, offering massive visual real estate that can be seen from across a crowded venue. However, executing a flawless custom print requires more than just dropping a corporate logo onto a white background. Because these structures are large-format assets designed to withstand demanding outdoor environments, the printing process is highly technical. A single low-resolution file or incorrect color profile can result in a blurry, pixelated, or off-color asset that damages your professional reputation rather than elevating it.
To help you navigate this process with total confidence, this comprehensive guide breaks down everything you need to know about custom tent artwork requirements. From file formats and color spaces to templates and common pitfalls, we will ensure your next branded tent is visually striking, brand-accurate, and built to perform.
The Commercial Power of Custom Printed Tents
When you invest in assets for your business or rental inventory, durability and commercial value must be your top priorities. A custom tent is a long-term investment in your brand infrastructure. It needs to look pristine on day one and remain pristine after dozens of setups, teardowns, and transport cycles.
For over 25 years, TentandTable has been headquartered in Buffalo, NY, supplying brand-new, commercial-grade equipment engineered specifically for demanding, heavy-use environments. Over more than two decades, we have refined our manufacturing and printing processes to ensure that B2B clients receive tents that deliver both exceptional structural integrity and crisp, high-fidelity branding.
Our core product categories cover the entire spectrum of event infrastructure:
-
Commercial Party Tents: Including heavy-duty pole tents, high-peak tents, and modular commercial party tents.
-
Commercial Inflatables: Heavy-duty bounce houses, obstacle courses, and water slides.
-
Event Furniture: Commercial-grade folding tables and banquet chairs designed for high turnover.
-
Supplemental Rentals: Staging, dance floors, and professional event lighting.
When integrating custom branding into your fleet, you are likely asking: Can my company logo be printed on a tent top? The answer is absolutely yes—provided the artwork complies with specific grand-format printing standards. Let’s dive deep into the technical requirements that guarantee a flawless result.
1. Vector vs. Raster: The Golden Rule of Large-Format Printing
The single most critical factor in custom tent printing is the type of file format you submit. In digital design, graphics are split into two categories: vector images and raster images. Understanding the difference between them is the difference between a crisp, professional tent and a pixelated disaster.
Vector Graphics (Required)
Vector graphics are entirely independent of resolution. Instead of relying on a grid of colored squares, they use mathematical equations, points, lines, curves, and shapes to define the image. Because the computer calculates the geometry of the graphic dynamically, a vector file can be scaled up to the size of a football stadium or down to the size of a business card without losing a single drop of clarity.
-
Standard Vector Extensions:
.AI(Adobe Illustrator),.EPS(Encapsulated PostScript), and vector-based.PDF(Portable Document Format). -
Why they are mandatory: When we print a logo onto a 20-foot valance or a massive high-peak tent top, your logo might need to stretch across six or ten feet of fabric. Vector files ensure that every edge remains perfectly sharp, smooth, and defined.
Raster Graphics (Highly Discouraged for Logos)
Raster graphics are constructed using a fixed grid of colored pixels. Common examples include photos taken on a camera or images downloaded from the web.
-
Standard Raster Extensions:
.JPEG,.PNG,.GIF,.TIFF, and.PSD(Adobe Photoshop). -
The Scalability Problem: A raster image looks great when viewed on a laptop screen. However, when you scale that same image up by 500% or 1,000% to fit the peak of a commercial frame tent, those tiny pixels stretch into visible blocks. The result is a blurry, jagged, unpolished image.
Pro Tip: Simply opening a
.PNGor.JPEGfile and saving it as an.AIor
2. Color Matching Accuracy: CMYK vs. Pantone (PMS)
When printing graphics on heavy-duty, UV-treated PVC vinyl or durable polyester fabrics, color translation is a major technical hurdle. Digital screens display images using the RGB (Red, Green, Blue) color model via emitted light. Printing presses, conversely, use physical inks to lay down color onto a physical substrate.
The CMYK Process
For full-color photographic prints or complex gradients on tent walls, digital grand-format printers use the CMYK color space (Cyan, Magenta, Yellow, and Key/Black). All artwork files submitted for custom tents must be set to the CMYK color mode before submission. If your designer creates the artwork in RGB, converting it to CMYK later can cause drastic color shifts, making bright, neon digital blues look muted or purple on the actual fabric.
The Pantone Matching System (PMS)
For corporate branding, logos, and specific brand guidelines, relying on CMYK digital blending isn't always precise enough across different fabrics. This is where the Pantone Matching System (PMS) becomes essential.
Pantone colors are standardized, pre-mixed ink formulas that correspond to specific universal codes (e.g., PMS 186 C for a specific corporate red).
-
When submitting your artwork, you should specify your brand’s official Pantone Solid Coated color codes.
-
Our production teams use these precise codes to calibrate our printing machinery, ensuring that the corporate colors on your tent match your business cards, vehicles, and digital branding exactly.
3. Image Resolution and DPI Requirements
While logos and text must be vector-based, there are times when your custom tent design will incorporate high-resolution photographic elements—such as a realistic background pattern, a scenic landscape on a full-back sidewall, or intricate product imagery.
If your design includes raster elements, they must adhere to strict resolution requirements:
-
1:1 Scale Print Resolution: If your files are built at 100% of the actual physical print size, the embedded raster images must be at least 100 to 150 DPI (Dots Per Inch).
-
Scale Templates: Many design templates provided by manufacturers are built at a smaller scale (such as 1:10 scale or 10% of actual size) to prevent file sizes from becoming completely unmanageable for design programs. If you are designing on a 10% scale template, your embedded raster graphics must be 1000 to 1500 DPI so that when the file is scaled up 10 times to its real-world dimensions during production, it resolves to a clean 100 to 150 DPI.
Anything less will result in visible pixelation when viewed up close by attendees at your events.
4. Typography and Fonts: Converting Text to Outlines
One of the most common production delays occurs when a client submits a beautiful vector design, but our pre-press team opens the file only to find that the text has defaulted to a standard generic font like Arial or Myriad Pro.
This happens because the specific font used by your graphic designer is installed on their local computer, but not on our production servers. To eliminate this issue, designers must convert all text to outlines (also known as converting text to curves or paths) before saving the final file.
-
In Adobe Illustrator, this is done by selecting the text and pressing
Ctrl + Shift + O(orCmd + Shift + Oon a Mac). -
Converting text to outlines transforms your live typography into permanent, vector shapes. It locks the text into place visually, ensuring that no matter who opens the file, the lettering looks exactly as intended without requiring font file installations.
5. Working with Production Templates: Bleeds, Trims, and Safe Zones
Custom tents are unique because they are not flat surfaces; they are multi-dimensional, geometric structures with slopes, peaks, valances, seams, and reinforcement patches. Because the printed fabric must be cut and stitched together precisely over a heavy-duty aluminum or steel frame, you must lay out your artwork using our exact manufacturing blueprints.
When you use a custom tent design template, you will see three critical guidelines:
The Trim Line
This is the physical boundary where the fabric will be cut during production. It represents the exact outer edge of the tent panel or valance.
The Bleed Line
The bleed line extends slightly past the trim line (usually by 1 to 2 inches in large-format printing). If your tent design features a solid background color, a pattern, or a photograph that is meant to cover the entire panel seamlessly from edge to edge, you must extend that graphic all the way to the outer bleed line. This provides a safety margin for the production team. If the fabric shifts slightly during the cutting or sewing process, the bleed ensures there are no accidental white unprinted borders along the seams.
The Safe Zone
The safe zone sits well inside the trim line. Because tents experience tension when stretched over frames and have thick sewn seams, straps, and corner reinforcements, any critical information placed too close to the edges could be cut off, obscured by a strap, or swallowed up by a seam.
-
Keep all vital brand assets—such as logos, telephone numbers, websites, and text slogans—strictly within the designated safe zone.
-
This ensures maximum readability and structural alignment once the tent is fully erected on-site.
Maximizing Your Investment and Tracking ROI
Adding a custom-printed tent to your event inventory should not be viewed as a sunk marketing expense. Instead, treat it as a high-performing business asset that actively drives revenue, brand recall, and inbound bookings. Whether you run an independent party rental company looking to upsell premium corporate packages or a brand expanding your regional presence, analyzing your asset acquisition cost against its revenue generation is vital.
Before expanding your warehouse footprint, you should verify the commercial math behind your new inventory. Try our ROI calculator to clearly model out initial asset costs, expected utilization rates, rental pricing models, and break-even timelines. This tool empowers commercial buyers to move away from guesswork and build a data-backed inventory expansion strategy.
When you purchase commercial-grade gear that outlasts standard consumer alternatives, your return on investment scales dramatically year over year. Knowing the top 10 costly mistakes to avoid when purchasing commercial vendor tents allows your team to skip operational pitfalls entirely, protecting your cash flow and ensuring your brand presentation is executed flawlessly every single time.
Comprehensive Artwork Requirements Checklist
Before you hit submit on your artwork files, run through this concise technical checklist to guarantee a smooth, delay-free production cycle:
| Requirement | Specification | Status Check |
| File Format | Vector .AI, .EPS, or vector-based .PDF |
Vector assets confirmed |
| Color Space | CMYK color mode (not RGB) | Verified in document settings |
| Color Matching | Pantone Solid Coated codes provided for logos | PMS codes listed |
| Text & Fonts | All text converted to outlines/shapes | Ctrl+Shift+O completed |
| Resolution | Minimum 100–150 DPI at 100% full-scale print | Checked raster elements |
| Bleed Margin | Background graphics extended to outer template bleed | Bleeds fully covered |
| Safe Zone | Logos and critical text are placed fully inside safe boundaries | Confirmed centered and clear |
Frequently Asked Questions
How long does the production and shipping process take for custom printed tents?
Because custom printed tents require precision printing, color verification, cutting, and commercial stitching, their lead times are longer than our standard in-stock inventory. Generally, once your vector artwork is officially approved by our pre-press department and payment is finalized, production takes roughly 2 to 3 weeks.
Following production, TentandTable leverages its efficient distribution network to provide fast nationwide shipping from our logistics channels directly to your business or job site. If you have an unyielding event deadline, we strongly recommend initiating your design process 4 to 6 weeks in advance to allow ample margin for artwork revisions and shipping transits.
Are your custom printed tents built to the same commercial standards as your clear and solid white tents?
Absolutely. At TentandTable, we do not compromise on structural durability for visual customization. Our custom printed tents are built with the exact same industrial-grade engineering as our legendary standard rental lines. We utilize heavy-duty, commercial-grade vinyl fabrics that are water-resistant, flame-retardant, and highly UV-protected to combat fading over extended sun exposure.
The frames are constructed using heavy-walled anodized aluminum or robust galvanized steel components, ensuring structural integrity in rigorous outdoor commercial settings. If you are debating structural configurations for your commercial operations, review our detailed breakdown on pole tent vs. frame tent options to choose the best option for your common installation sites.
Can we print graphics across the entire tent surface, or are we limited to specific logo placements?
We provide flexible solutions tailored precisely to your operational budget and brand vision. We offer both spot-printing (placing your logo in specific locations like the valance or centered peaks on a standard white background) and full-surface dye sublimation printing.
With full-surface printing, every square inch of the canopy top, peaks, valances, and sidewalls can be fully customized with rich colors, complex background patterns, and large photographic elements. This allows you to create completely custom gathering spaces that fully reflect your brand's unique corporate aesthetic.
What is the most versatile tent size to print our brand assets on for diverse events?
For general event marketing, trade shows, vendor booths, and community pop-ups, the 10x10-foot canopy is the standard layout. If you need assistance choosing the right model, read the ultimate guide to choosing the perfect 10x10 tent.
However, if your business regularly services larger corporate functions, regional festivals, or hospitality zones, scaling up to a larger frame structure is highly advantageous. If you are unsure exactly how much physical space your functions require, read our comprehensive overview addressing what size party tent do I need to perfectly match footprint capacities to guest volumes and seating configurations.
Conclusion
Investing in a premium custom-printed tent is one of the most effective methods to assert your brand's market presence, establishing instant authority at any outdoor gathering or corporate event. By prioritizing commercial-grade materials and meticulously preparing your vector artwork to align with expert technical printing standards, you can avoid costly design re-runs and project delays. This technical diligence ensures your high-value asset arrives completely ready to perform, anchoring your brand identity flawlessly for years to come.
Are you ready to elevate your brand presence with a commercial-grade, high-impact custom tent designed to outlast the competition?
Contact our TentandTable team today to connect with our design experts, request production templates, or explore our massive lineup of commercial party tents, event furniture, and commercial inflatables. Let's build an unforgettable visual centerpiece for your business operations.