


As we navigate the busy 2026 event season and beyond, commercial entities—including event rental operations, schools, universities, churches, and summer camps—face an unprecedented demand for outdoor gathering spaces. To stay ahead of the competition, businesses must rely on equipment that delivers a striking visual appeal, unmatched durability, and quick setup times.
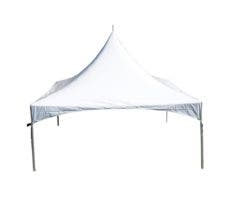
Enter the 20 x 20 High Peak Frame Tent. This specific footprint is widely considered the "sweet spot" of commercial inventory. It is large enough to cover significant seating arrangements, yet compact enough to be managed by a small crew.
The elegant, sweeping high-peak design eliminates the need for a center pole resting on the ground, maximizing the usable square footage underneath. However, a tent is only as safe and profitable as its installation process. Missteps during setup can lead to fabric damage, structural failure, or costly delays.
For over 25 years, TentandTable (headquartered in Buffalo, NY) has supplied durable, brand-new, commercial-grade equipment built for demanding environments. We understand the logistical challenges B2B buyers face every day. That is why we have compiled this comprehensive, step-by-step guide featuring 6 essential tips for installing your 20 x 20 High Peak Frame Tent safely and efficiently.
Understanding Your Asset: Frame Tents vs. Pole Tents
Before diving into the installation steps, it is important to understand the structural advantages of the equipment you are deploying. If you are balancing choices for your fleet, reading a pole tent vs frame tent quick guide can clarify your options.
While pole tents rely on heavy tension from stakes and center poles to stay upright, frame tents use a rigid skeleton made of heavy-duty anodized aluminum. This framework supports the vinyl tent top independently, allowing for versatile placement close to buildings, inside courtyards, or on hard surfaces. To dive deeper into making the right purchasing decisions for your commercial inventory, consult our comprehensive frame tent buying guide to review load ratings and frame designs.
Pre-Installation: Site Inspection and Safety First
A successful installation always begins long before the first fitting is joined. Your crew must perform a thorough site inspection to guarantee safety and compliance.
1. Check for Overhead and Underground Utilities
Always call local utility locators (such as 811) before driving heavy-duty stakes into the ground. Ensure there is clear vertical clearance from power lines, overhanging tree branches, and building eaves.
2. Analyze the Surface Material
The ground dictates your anchoring strategy. Setting up on a pristine lawn requires traditional stakes, while working on a parking lot or plaza requires an entirely different approach. Understanding how to set up a party tent on concrete, cement, and other hard surfaces ensures your team is equipped with the correct ballasts, weight plates, or concrete anchors before arriving at the job site.
6 Tips for Installing Your 20 x 20 High Peak Frame Tent
Tip 1: Use a Commercial Drop Cloth or Tarp
The premium block-out vinyl used in commercial party tents is engineered to withstand heavy wind, rain, and UV rays. However, it can still suffer cosmetic damage or pinhole punctures if it is dragged across abrasive surfaces like concrete, gravel, or sharp twigs during layout.
-
Actionable Advice: Always lay down a heavy-duty ground tarp or dedicated tent drop cloth over the entire 20 x 20 footprint before unloading your frame pieces or vinyl.
-
Pro Benefit: Keeping the vinyl clean during assembly reduces the time your warehouse crew spends on backend maintenance. If your team manages multiple assets, integrating a proper routine based on commercial tent cleaning guidelines will significantly prolong the lifespan of your fabric.
Tip 2: Master the Systematic Layout and Pinning Safety
Efficiency on the job site relies on organization. Lay out your color-coded or size-specific tubing in the exact shape of the 20 x 20 perimeter.
-
Place the four corner fittings at the corners.
-
Lay out your 4 spreader pipes (forming the 20x20 square perimeter).
-
Lay out your 4 hip rafters pointing inward toward the center crown fitting.
Safety Note: When joining tubes to the cast aluminum fittings, ensure every single R-pin or bale pin is fully engaged and locked. Fastening the frame securely prevents structural shifting when the tent is raised and exposed to wind loads. Never substitute temporary bolts or incorrect pins for factory-certified fasteners.
Tip 3: Assemble the High Peak Mast and Tensioning System Correctly
The defining feature of a high peak frame tent is its elevated, elegant center peak, which is achieved without a full-length center pole extending to the ground. Instead, a floating center mast is supported by cross-cables that attach diagonally from corner to corner.
-
The Golden Rule: Hook up the cross-cables before you lift the frame or pull the vinyl top over the structure.
-
Ensure the cables form a taut "X" across the top of the perimeter frame.
-
The center mast pin should insert cleanly through the center ring of the cables. When you lift the mast to tension the vinyl top, do so evenly to avoid distorting the frame skeleton or overstraining one corner of the fabric.
Tip 4: Pull the Tent Top with the Wind, Not Against It
Handling a large sheet of 16-ounce, commercial-grade vinyl can turn into a dangerous sail if a sudden gust of wind catches it.
-
Execution: Position your crew on the downwind side of the frame. Unroll the tent top along one side of the perimeter frame and pull it across the structure in the direction of the wind. This allows the air currents to lift and float the vinyl across the frame smoothly, rather than fighting against your crew.
-
Securing: Immediately fasten the interior alligator-style buckles or straps around the perimeter tubing to secure the top to the frame before attempting to raise the legs.
Tip 5: Utilize Mechanical Assistance and Proper Lifting Tools
An assembled 20 x 20 frame with its vinyl top attached carries substantial weight. Attempting to lift the entire structure manually to place the legs can strain your crew's backs or cause uneven lifting that bends frame components.
-
The Solution: Invest in a dedicated mechanical lift. Understanding what a tent jack is and when/how should you use one can transform your deployment speed.
-
Process: Lift one side of the tent frame evenly using tent jacks, slide in the two windward legs, lock their pins, and then repeat the process on the opposite side. This minimizes physical fatigue and lowers on-site injury risks, keeping your crew fresh for subsequent setups.
Tip 6: Standardize on Commercial Ratchet Straps for Anchoring
Ropes can stretch, loosen under moisture, and require specialized knot-tying knowledge that varies from worker to worker. For commercial-grade safety and predictable performance, standardizing on webbed ratchet straps is highly recommended.
| Feature / Benefit | Heavy-Duty Ratchet Straps | Traditional Manila/Nylon Ropes |
| Tension Reliability | High mechanical precision; does not slip | Prone to loosening under varying humidity |
| Ease of Training | Simple mechanical operation for all crew sizes | Requires mastery of complex tension knots |
| Load Capacity | Rated for extreme wind shear and structural stress | Variable rating depending on wear and knot quality |
To ensure your team is maximizing structural security, review the step-by-step procedures outlined in our guide on how to use ratchet straps properly. Connect your ratchet straps directly from the heavy-duty corner fittings of the tent frame down to your anchoring points (such as high-tensile steel stakes or concrete ballasts), maintaining an optimal 45-degree angle for maximum holding power.
Expanding Your Operational Footprint: Packages and Accessories
A standalone 20 x 20 high-peak frame tent is highly versatile, but integrating it into complete package deals maximizes its commercial value. High-volume B2B rental operations rarely rent a tent by itself; they bundle it with essentials to build functional gathering environments.
Complete Event Infrastructure
To drive higher ticket averages, look into matching structural add-ons. Consider pairing your tent sales with options from our commercial tables and chairs lines. Delivering a complete package of clean, reliable furniture alongside a premium tent canopy positions your brand as a single-source solution for corporate parties, school graduations, and wedding venues. Additionally, expanding your fleet into premium event rental equipment like temporary staging, safety lighting, or dance floors helps secure highly profitable contracts.
Diversifying into Inflatables
Many event rental business models scale by combining structural party tents with entertainment inventory. Adding commercial inflatables—such as bounce houses, obstacle courses, and water slides—allows your business to serve backyard birthday parties, church festivals, and community fairs simultaneously.
Evaluating the Long-Term ROI for B2B Buyers
When purchasing capital equipment for your institution or business, running real operational numbers is crucial. Purchasing commercial-grade tents rather than renting them repeatedly saves thousands of dollars in logistics and rental fees for universities, churches, and municipalities over time.
Before making your next inventory investment, try our specialized online tool: try our ROI calculator to accurately project your payback period, break-even milestones, and long-term rental margins.
Frequently Asked Questions (FAQs)
What are your standard shipping times for bulk or large tent orders?
At TentandTable, we understand that timing is critical to your event calendar. Operating from our central headquarters in Buffalo, NY, we offer fast nationwide shipping on our inventory. Standard in-stock orders typically ship out within 24 to 48 hours. For large-volume freight orders or custom-printed tent structures, transit timelines vary depending on your destination region, but our logistics team coordinates real-time tracking to ensure your delivery arrives well ahead of your installation deadlines.
Are these tents truly commercial-grade, and what makes them durable?
Yes, every high-peak frame tent we manufacture is designed for demanding commercial applications. We utilize 16-ounce, heavy-duty, block-out PVC vinyl tops that are fire-retardant, UV-resistant, and 100% waterproof. The frameworks are built from heavy-duty, 2.5-inch anodized aluminum tubing that resists rust, corrosion, and bending under high structural loads. Unlike lightweight consumer canopies, our structures are engineered to be set up, taken down, and transported hundreds of times per year.
Can we set up a 20 x 20 high peak frame tent on hard surfaces like concrete or asphalt?
Absolutely. One of the primary advantages of a frame tent over a pole tent is its self-supporting aluminum skeleton. It does not require center stakes to maintain its shape. When installing on concrete, asphalt, or interior floors where driving stakes is impossible, you must secure the tent legs using certified alternative ballasts, heavy vinyl sandbags, or concrete weight plates to guarantee wind-load safety.
Do you offer volume discounts or flexible financing options for schools, churches, or start-ups?
Yes, we work closely with institutional buyers, non-profits, and growing rental agencies. We offer volume pricing tiers for fleet expansions and regular seasonal orders. Additionally, we provide seamless commercial equipment financing programs to help businesses preserve working capital while deploying their revenue-generating assets immediately.
Conclusion
Deploying a 20 x 20 High Peak Frame Tent gives your business a safe, elegant, and highly profitable structure capable of serving diverse clients for years to come. By prioritizing site safety, using drop tarps, using mechanical tent jacks, and standardizing your tie-down anchoring with ratchet straps, you protect both your workforce and your financial investment.
With over 25 years of proven industry expertise, fast nationwide shipping, and a dedicated team of commercial product specialists, TentandTable is ready to help you expand your operational capabilities.
Ready to upgrade your inventory or need expert guidance on your next large-scale event layout? Contact our TentandTable team today to speak with a solution-oriented specialist and secure your commercial-grade event equipment.
With the summer and fall rental seasons quickly approaching, is your inventory fully prepared to handle the peak demand, or are you leaving potential revenue on the table for your competitors?